What started as a text from a friend turned into one of the wildest DIY RV renovation projects you’ll ever see. Trenton reached out asking if his buddies could build him and his girlfriend a tiny house to live in. The answer was yes, and the plan was simple: find a cheap camper on Facebook Marketplace and turn it into something amazing.
That plan got a lot harder once they actually saw what they bought.
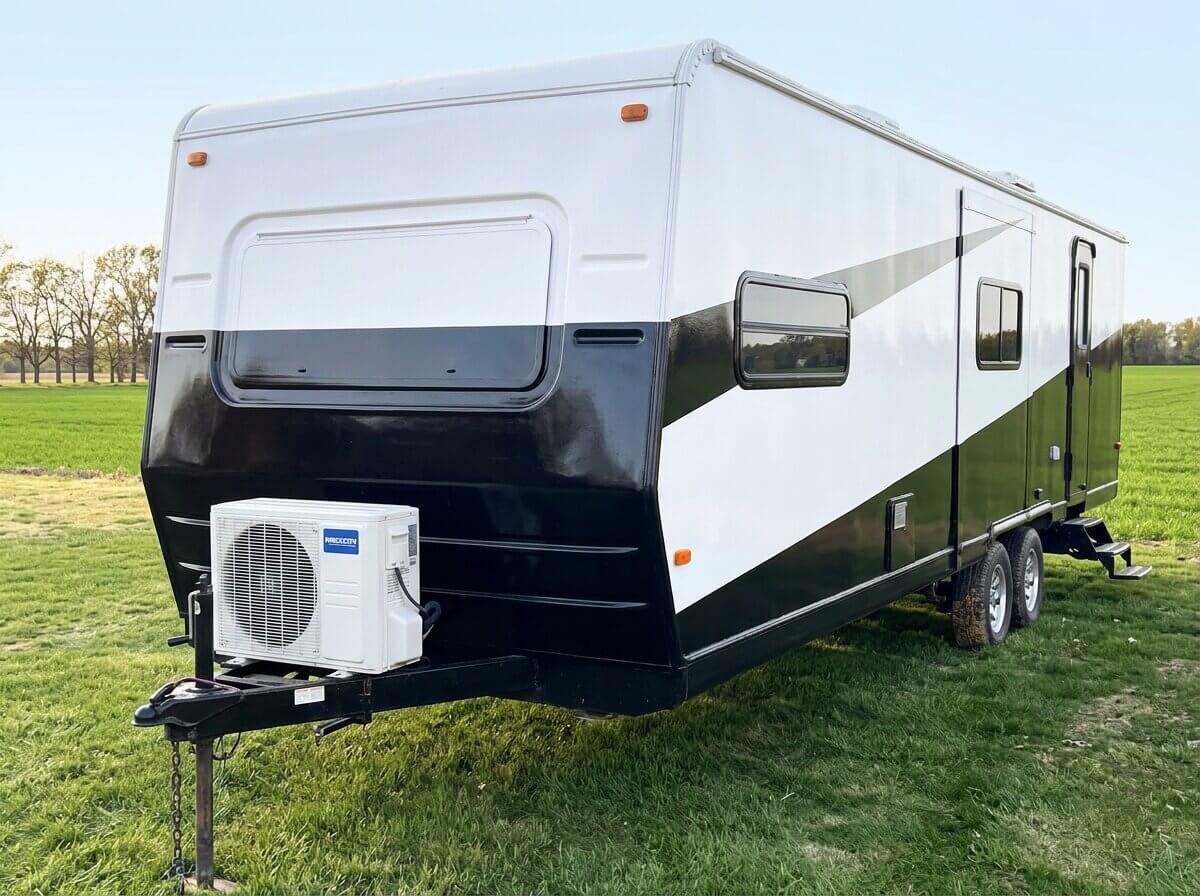
The full video below shows every step of this DIY RV renovation, but here’s a quick rundown of how a beat-up 30-foot camper became a luxury tiny home for around $20,000.
The $4,000 Facebook Marketplace Find That Started the DIY RV Renovation
The camper looked like a steal at first. It was 30 feet long, seemed mostly livable, and only had a few small leaks. The crew handed over almost $4,000 and felt pretty good about the deal.
Then they took a closer look. Nothing worked. Everything was filthy. The toilet was so bad that even the wall behind it was stained. The “minor leaks” were way worse than advertised, and the whole place smelled funny in a way that should have been a red flag for any DIY RV renovation project.
Just emptying the camper out was a project on its own. It took hours to clear the living room alone, and the trash pile ended up almost 7 feet tall. To get a sense of how much junk was packed inside, the team weighed the camper before and after. It went from 6,480 pounds down to 4,300 pounds. That means 2,200 pounds of stuff came out of it.
A Floor and Roof Disaster
Once the walls came out, the real horror show started. Mold was everywhere. The wood was rotten in nearly every spot, and the ceiling had already started caving in. Two full days went into scraping rotten wood off the walls and ceiling before they even got to the floor.
The floor was just as bad. Since the camper would be staying on Trenton’s land and never moving, the crew pulled out the holding tanks and got down to a clean subfloor. From there, they built things back up the right way with wood under the metal frame to stiffen everything, a layer of foam insulation, spray foam to seal the gaps, and a fresh subfloor glued down on top. The difference between the original moldy mess and the new solid floor was night and day.
Then came the roof problem. That saggy ceiling they noticed early on? It was rotting from the inside out because of holes in the roof that had never been resealed. Here’s a tip worth remembering for any DIY RV renovation: if you ever own a camper, you’re supposed to reseal the roof every couple of years. Skip that step, and you end up with exactly this kind of damage.
To fix it, one of the builders picked up a brand new skill on the fly: welding aluminum. After some practice and a few sketchy-looking welds, the team cut and welded aluminum beams across the entire roof to tie the walls together. Then they added triangle-shaped wood pieces for water runoff and capped the whole thing with plywood. The result was a walkable, leak-free roof that was stronger than the original.
If you’re thinking about buying a used camper to fix up, take this as a warning. A $4,000 camper can hide a whole lot of expensive damage.
New Walls, Wiring, and Climate Control
With a solid floor and roof, it was time to rebuild the walls. The crew framed them out with 2x2s, kind of like you’d find in a real house, which gave the whole camper a tight, sturdy feel. After the framing was up, you couldn’t even flex the ceiling anymore.
Next came the fun stuff. They ran electrical lines back to the breaker box, installed a water heater, ran plumbing with red and blue PEX lines throughout the camper, and added 19 can lights in the ceiling. A messy rat’s nest of wires got cleaned up into neat rows at the breaker, which is always satisfying to see.
For heating and cooling, the team went with two Mr. Cool DIY mini splits, one for the main living area and one for the bedroom. These units are designed for houses that don’t move, so mounting them on a camper was a bit of a creative workaround. Since this camper will only move one time in its life, it worked out fine. The DIY lines come pre-charged with refrigerant, so installation only took about 30 minutes. There’s even a smart chip that lets you control the unit from your phone.
Once everything was wired, plumbed, and insulated, the walls got sealed up with super thin 5mm plywood to keep weight down. The new vinyl roof went on next, which is basically a giant sheet glued down like a pool liner. It took a couple of hours of painting glue, sticking vinyl, and repeating, but the new roof looked amazing when it was done.
Kitchen, Bathroom, and Custom Cabinets
The kitchen and bathroom are where this DIY RV renovation really started looking like a luxury tiny home instead of a camper. Kobe built every cabinet from scratch, and the doors alone took days of work. Each one had to be Bondo’d, sanded, primed, and painted. He also made beautiful crown molding stained in a brownish red color to match the modern country look the crew was going for.
The kitchen got wood countertops stained to match the crown, a dishwasher, a cooktop, and a sink. Since the countertops were real wood, they needed a heavy waterproof coating to hold up to daily use. A nice backsplash finished off the space.
The bathroom got the full treatment too. A tiled shower with proper waterproofing, a new bathroom sink, and a real house toilet replaced the gross old camper toilet. The biggest puzzle was squeezing a full washer and dryer into the tight space next to the shower. The washing machine slid in easy, but the dryer was a real fight. After some careful work on the vent, lines, and drain, all three pieces ended up exactly where they belonged.
The Bedroom, Living Room, and One Wild Couch Story
For the bedroom, the team reused the original aluminum bed frame, which was actually one of the only mold-free pieces in the whole camper. They made it a little bigger so it could fit a queen-sized bed instead of a full. New carpet went down because, honestly, carpet in a bedroom just feels right. It’s cozy and helps absorb sound.
Then there’s the couch story. A 7-foot couch from Facebook Marketplace seemed perfect for the living room until it came time to actually get it inside. There was no way it would fit through the door. The feet came off. Every angle got tested. Nothing worked.
So the solution was a little extreme. The fabric got stapled to the back of the couch and then cut open. Wood was cut on the frame so the couch could fold in half temporarily. After some terrifying ratchet strap work, the bendy couch slid through the door, got unfolded, and was rebuilt inside with scrap wood, glue, and staples. Since the back of the couch faces a wall and will never be seen, the staples don’t matter.
The dinette is where things got really creative. Trenton’s girlfriend has a cat, and that cat needed somewhere to live too. So one of the dinette benches doubles as a hidden cat room with a litter box inside and a vent that runs outside. The cat gets its own little door to come and go, and the camper never has to smell like a litter box.
The Big Reveal and Final DIY RV Renovation Numbers
After months of work, the camper got a coat of gray primer followed by a fresh factory white paint with a modern twist. Side-by-side photos of the living room, bathroom, and bedroom showed just how far this thing had come. What was once a moldy, leaky shell was now bright, spacious, and genuinely nice to be in.
When Trenton and his girlfriend Liz finally took off their blindfolds, their reactions said it all. The first thing Liz noticed was that the hole in the wall was gone. Then she spotted the washer and dryer and could not believe it actually fit.
Here are the final numbers for this DIY RV renovation. The new camper weighs 8,000 pounds, which is a great result given how much was added back in. The total cost for the entire build, including the original $4,000 camper, came in right around $20,000.
The biggest lesson from this whole project? Used campers can hide a ton of problems. If you’re planning a DIY RV renovation like this one, look very carefully at what you’re buying before you hand over any money. A cheap camper can turn into an expensive one really fast.
Watch the Full DIY RV Renovation Build
The article only scratches the surface of what went into this DIY RV renovation. The full video walks through every wild moment, including the couch surgery, the welding lessons, and the side-by-side reveals that show just how much can change in a few months. Give it a watch above to see the whole thing come together.